


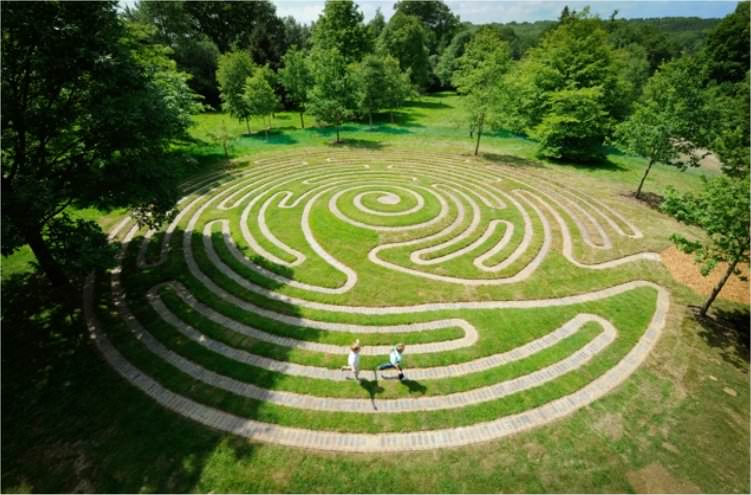
Tips On How To Build A Labyrinth

Is there an easy way to determine the dimensions of the sides of an
octagon for our canvas?
To make an octagon you want to cut off the corners, but how much to cut? The answer is .2929 times the side of the square. So, in this case, if the material is 20 feet, that’s 240 inches. Multiply that by .2929 and you get 70.296 or slightly more than 70 and 1/4 inches. Measure that amount in both directions from the corner, draw a line to the marks and cut it off. Should be very close. This assumes, of course, that your material is square. If not, first measure to make the square and then follow this advice. Then, before cutting, measure to see that the sides are indeed equal. If not, make any slight adjustment.
Donate to In5D
With over 6,000+ free articles and 1,200+ free videos, any donation would be greatly appreciated!
Much love for your kind donation,
Gregg
Is there a difference between a left-handed or a right-handed labyrinth?
The handedness of a labyrinth refers to the direction of the first turn. If you walk in and then turn left, it is a left-handed labyrinth. Most of the modern books on labyrinths, including my own, show left-handed labyrinths. This is clearly the norm. However, Sig Lonegren tells me that historically, most of the labyrinths were actually right-handed. I suppose if that’s how we printed our instructions, then more people would make right-handed labyrinths. With regards to one’s experience in walking, I have no information that one is any different from the other. There have been events at which we made two labyrinths, side by side, one right-handed and the other left-handed. I don’t recollect anyone saying that they thought one was different than the other.
How big must my labyrinth be to accommodate wheelchairs?
If you made an 11-circuit labyrinth with paths large enough to hold a wheelchair, it would be so long (more than 3/4 mile in and back out) that the person in the wheelchair would need to be an athlete to have the stamina to complete the labyrinth. It’s even borderline for a 7-circuit labyrinth. The generally accepted solution is to make the labyrinth flat, and of a hard surface, such as concrete. Then, the wheelchair can straddle the paths, with the wheels in the adjacent paths. In this way, the labyrinth can be of a more average size, say 40 to 50 feet in diameter. Otherwise, it would be 100 feet, which would be huge.
TRIVIA: The Romans built many primarily decorative labyrinth designs on walls and floors in tile or mosaic. Many labyrinths set in floors or on the ground are large enough that the path to the center and back can be walked. They have historically been used both in group ritual and for private meditation.
What kind of paint do I use for painting a labyrinth on asphalt or concrete?
For asphalt, use traffic paint. The key is to make sure the asphalt is clean and
dry, free of loose particles, etc. The paint is made to withstand the elements. For concrete, contact any large, professional paint store and they should be able to help you. Porch paint is one possibility, although there are others which last even longer. You should have a good choice of colors. We use a special acrylic resin that we have mixed especially for us. There are examples of painted labyrinths in our gallery section. (See: Our Work)
What direction should the entrance of the labyrinth face?
Gothic cathedrals are oriented east and west. Even if they aren’t, the far wall, opposite the entrance, is called the “east wall,” representing the direction of Jerusalem. Symbolically, one enters in the west, representing the setting sun, death and dying, this world, and proceeds towards the east, representing the rising sun, hope, light, and transformation. Hence, labyrinths in Gothic cathedrals, including Chartres, have the entrance facing towards the west, so that one enters walking towards the east.
There are other labyrinth traditions, however. One is to find the orientation of the labyrinth through dowsing or some other intuitive method. Literally ask the earth. In Scandinavia, hundreds of labyrinths were built around the Baltic Sea, with the entrances facing towards the sea. This was probably so the fishermen who built them could go from the labyrinth directly to their ships. Another way to orient a labyrinth is to line it up so the vertical axis points towards a feature in the terrain, such as the notch in a mountain or a large tree. Still another possibility is to orient the axis according to an astrological event, such as the sunrise on the summer solstice, or on a particular saint’s day (or on your birthday). Finally, the site itself sometimes determines the orientation of the labyrinth, due to its unique circumstances.
What is the minimum size for the paths on a labyrinth?
I would say eight or nine inches. Even then, retaining one’s balance while walking begins to be an issue. If you have asked this question because you have limited space for a labyrinth, it is better to use a design with fewer circuits than to make them too small. Usually, this question comes from someone who really wants a Chartres pattern, but only has, say, 25 feet of space. It just can’t be crammed into that space. Better to choose a seven-circuit pattern, such as a classical labyrinth or a Santa Rosa.
Can we build a labyrinth at our camp for the donation of $3,000 that we have received?
You can make a very suitable labyrinth with that budget. Find an area that is flat and drains well. Clear it and cut the grass very short, as short as the mower can do it. Cover the area with landscaping cloth, which will keep weeds from growing up. You will be laying the cloth in rows which overlap by six inches or so. Tape the pieces together to hold them in place. Then, draw the labyrinth pattern in chalk on the cloth. We have instructions on our website. If you make a mistake, just wash off the chalk and correct it. Trim the landscape cloth to the edge of the pattern. Then, put bricks or stones on your chalk lines, which will make the pattern for you. Finally, put mulch or some other material for your paths. (You could also use decomposed granite or sand.) On our website you will see photos of a similar labyrinth. Go to Our Work and look under the bricks and mulch section for the labyrinth at Silver Bay.
The cost of the landscaping cloth will be significant, perhaps $800 or so. You will need several rolls, depending on the size of your labyrinth. If you use bricks, that will be as much as $2000, again depending on size and pattern. If there is a river where you can gather your own stones, it will be labor intensive, but will save money. Stones can also be purchased from a quarry and delivered at a cost less than bricks. Ask for six-inch size, to avoid getting gravel. There are a number of kinds of mulch. Landscaping companies give away their mulch, made from grinding up trees they have removed. But it decomposes rather quickly. Eventually, that turns to soil and things begin to grow in it. Better to use cedar mulch. It will take a truck load, which could cost several hundred dollars. Playground mulch is made so that there are no slivers or sharp ends. There is also rubber mulch, made from recycled tires, which never decomposes, but it would cost close to $2,000. If you get the rocks or brick donated, then perhaps you can splurge for the rubber mulch. You can find sources on the Internet, or through a local landscape or gardening center.
This gives you a general idea of what is involved. If you get all of the materials donated, you could spend $2,000 of your donation to have me come and direct your volunteers in the construction. That is what was done at Silver Bay. Or use the money for amenities such as benches and lighting. Send me photos whenit’s done.
http://www.labyrinth-enterprises.com/FAQ002.html
Make a Labyrinth: Getting Started
The guide needs to be securely fastened to the center of the labyrinth. One way is to put a toilet plunger in the center of the labyrinth, have someone stand on it (or tape it to the floor, or put a barbell weight over it) so that it can’t move. Attach the guide. If you are using rope, then a loop will suffice. Be sure that you make your marks for the circles after tying the loop. If using a metal tape measure, saw off the handle of the plunger so it only sticks up an inch or so. Hammer a nail into the top of the handle and hook the tape measure on it. If there is no hole in the tape measure, wrap masking tape around the end of the tape measure so that it sticks out beyond the end, and put a hole in the masking tape. Or you could just have someone hold a broomstick. If that’s the case, you may still want to tape it down in some fashion or at least mark its spot on the floor, because volunteers have a way of losing concentration and inadvertently moving the broomstick or plunger, thereby throwing off the measurements. You may think up other ways to attach the rope. It must have free 360-degree movement. If using a tape measure, you may be able to put a board on the floor, hammer a nail at the desired center point, and slip the end of the tape measure over the nail.
Since I make labyrinths frequently, I have constructed a round board with a one-inch hole in the middle. Over that hole I have placed a floor flange, which is found in the plumbing department of any hardware store. It can be screwed down, and has threads that allow you to screw a pipe into it. Inside the pipe I have jammed a wooden dowel with a nail in the top. With this system, I mark the center of the labyrinth with an X, then place the flat wooden piece (it doesn’t have to be round) over the center-to-be of your labyrinth, looking through the hole in the flange to make sure it is centered on the X. If taping the board to the floor, this is the time to do it. In my case, I screw the pipe into the flange and then lower a 20-kilo barbell weight over the pipe, to hold it down without moving.
You can wait until the guide is attached to the center post to lay out the marks for the twelve concentric circles, measuring out from the center. The first mark will be equal to the radius of the circle. For our example, we are making a 36-foot circle with a nine foot center, the radius of which is 54. On rope, you can make a mark with a felt tipped pen or magic marker. On a metal measuring tape, you can make the mark directly on the guide by wrapping a piece of tape at the designated point. Then each additional path will be spaced according to the appropriate calculation that you made at the beginning. For our example, that is 14 and 3/4 inches apart. In such case, the second mark will be 54 inches plus 14 and 3/4 inches, or 68 and 3/4 inches. The third mark will be 68 and 3/4 inches plus 14 and 3/4 inches, and so forth, until all of the marks are completed.
How to build a Knidos Labyrinth with Bark Mulch
by Erwin
How to do that should be clear theoretically. It was posted earlier on this blog. But if you do not remember any more or would like to look once again: the posts below are recommended.
The labyrinth here has a dimension between axes of 50 cm, the center should get a diameter of 2 m, the central square also has sides of 2 m length, the whole diameter will thereby be 9 m.
We first stake off the 5 mean points on which later literally everything turns.

The 5 mean points
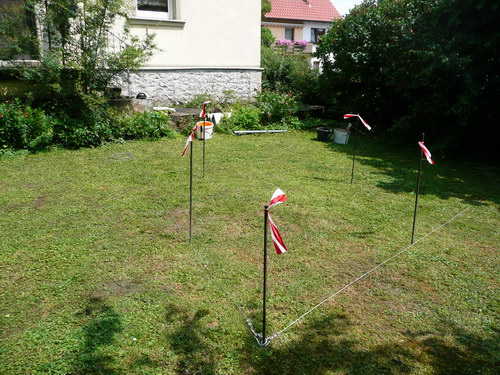
The marked 5 points
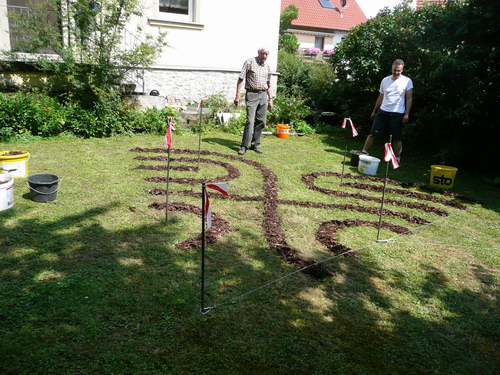
Then the internal and a little more complicated parts are “built”: strewn with bark mulch. These are all parts which are lying within a triangle formed by the 5 marked points. Thus a cake piece is built through the the inner ways of the labyrinth which are all specified by 4 different centers and different radii.
It is advisable to start with the internal cross, the only straight lines in the labyrinth; and then to form the remaining bends.
Doing so, the basis is created for the 8 following in parallel distance running arcs.

The inner arcs
The inner arcs
Now it is only a matter of finishing the remaining bends around the centre in the middle. Every arc has the same center and a 50 cm bigger radius than the preceding arc, if one works from the inside outwardly. The arcs are running from the right side completely to the left and vice versa. For this work many people can be occupied. One could put on even 8 curves at the same time. Or work from two sides as it was done here.

The complete labyrinth

The completed labyrinth
The exact dimensions of the used radii can be taken from the following drawing, also the other necessary measures.
Here you can see/print/store/copy the drawing as a PDF file:
http://bloggermymaze.files.wordpress.com/2009/08/knidos_50_muster_alles.pdf


Here the dimension between axes of 50 cm was used. A radius of 50 cm for the smallest arc and for the biggest one a radius of 4.50 m. Therefore the whole diameter amounts to 9 m. For the size of the center the 4-fold dimension between axes was applied. Thus the diameter of the center is the same as the side length of the square formed by the 4 inflection points.
The labyrinth is scalable in the size. If one wants to build, e.g., one with a dimension between axes of 1 m (what results 18 m for the whole diameter), one multiplies all measurements by 2.
In5D PATREON: https://www.patreon.com/in5d See our In5D articles the day before they’re released, AD FREE, on Patreon for a minimal donation!
Follow In5D on Patreon, Telegram, Twitter, Bitchute, TikTok, Instagram, Facebook, YouTube, Gab, and Truth Social @greggprescott